I gave myself the challenge of turning this 2011 Suzuki TU250X into a custom I love for less than $750

Ever since I first found pipeburn.com I loved the look of the 70s and early 80s Japanese bikes simplified down into brats or scramblers. When this 2011 Suzuki TU250x road bike came along, I couldn't resist.
This is one of four motorcycles I have in my life and I bought it for a specific purpose - but as with any vehicle I buy, it doesn't take long before I start looking at it - and looking at pictures of "custom its" out there and it gets me thinking.
Any time you modify a bike you're often making it better in some ways and worse in others. Trading functionality for weight. Trading comfort for style.. and of course, trading function for looks! I've tried to make sensible choices on that last one - as looks are very important to me. Riding and Ogling are both on my list of priorities that have driven this build and those are detailed below.
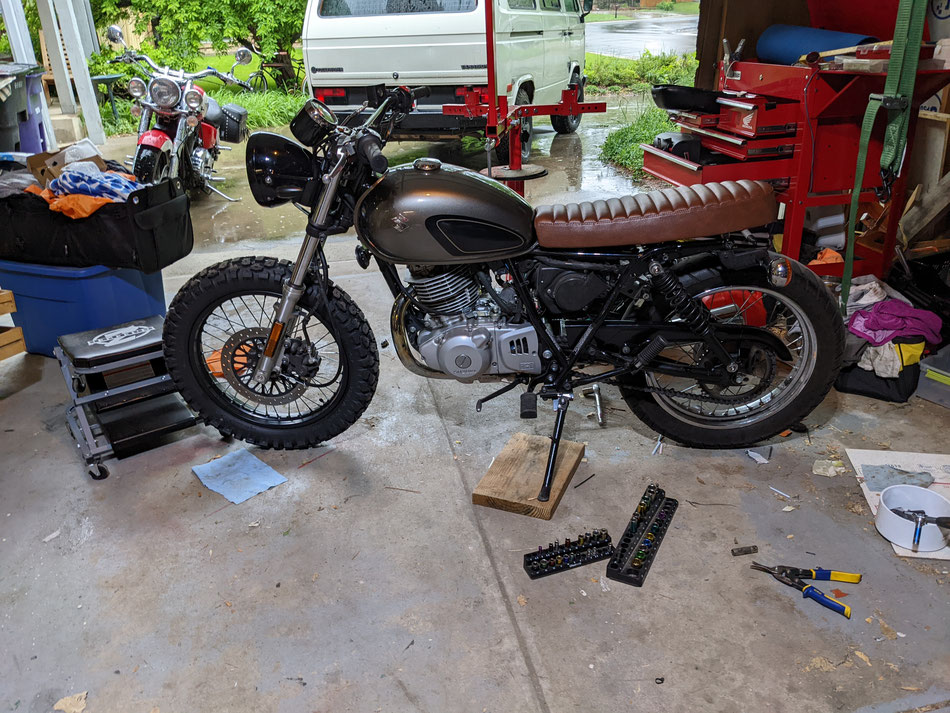
Here's the end result. I'm super happy with it - and YES, I kept it under $750. I'm linking all parts in this blog post, because when I see something cool on facebook I'm always asking where they got the part, so hopefully this makes someones life easier.


How I'm going to use this bike.
This bike is part of a stable of bikes and I bought it, and am building it out to play a specific role. My other bikes.
- I have a cruiser that is comfortable for long distances. It's a decent freeway mode of transport. I don't intend to run the Suzuki on the highway if I can possibly help it.
- I have a Honda CT90. It can drive up walls. I've been at the top of mountains on it and people riding by think they are being punked. The Suzuki is not intended for hardcore off road. If I'm heading off for the day to ride OHV trails, it's on the Honda 90. It's more capable and it's slower - which is a good thing because I lack self control at times.
- I have an upgraded 1965 Honda 50. When camping with the Vanagon I throw it on the trailer and it's my way of exploring for me, and two up with my wife. It struggles with that. It's modified with the front fork and wheels from a 1964 trail 90, and a 110 engine but still. At altitude two up it wheezes along. Two up it's not exactly comfortable.


The primary reason for the Suzuki is that it does everything that the Honda 50 does.. but better.
The reason for the Suzukis existence is:
- It's light enough to be easy to throw on and off the trailer
- it's light enough that it makes no noticeable difference to towing weight
- It's GREAT two up
- With the dual sport tires, it's perfect for exploring around the kinds of locations that we camp two up
- It's got some capacity for me to ride it on trails that aren't too demanding
- I needed a project :)
- It came up for sale cheap. $2450 (2011 14,000 miles)
Mods and Parts
I'm sharing the mods and parts because so often I come across a forum picture, or a facebook group post and I'm asking, "What is that.. where did you get that.. how did you fit that.." and I'm thinking I can't be the only one, so here it all is in black and white.
About Dechroming and Black out
Three main methods of going from chrome to black. I don't like all black bikes, but I like pops of color - not pops of chrome.
Three main methods used:
- buy black parts
- plastidip
- black paint
Buy black parts.. duh, but on Plastidip vs black paint (enamel for short) I've learned some things the hard way over the years. Using spray can enamel is never as good as power coating - that's the RIGHT way to do this stuff, but that not something I can do at home, so here's my selection criteria:
Plastidip:
- If it takes a beating plastidip doesn't chip off and look like crap in the way that enamel does
- If plastidip will do a really good job, then why not? It's much more forgiving
- If the part is expensive or a high quality painted part then dip, because it's reversible
- If I'm experimenting with color
Enamel:
- If I'm REALLY SURE I want the color change, and it's not a part that's going to get beaten up by rocks
- If it's a cheap part and I don't care and it's not a feature part
Painting with Enamel / Normal paint
The biggest thing to know about painting with real paint, especially with chrome is to prep the surface well. You'll want to rough it up a bit with 400 grit wet and dry (wet) and before and after doing that use a quality degreaser. Then if you're painting over something like chrome, use etch primer. This is essential to have half a chance of a decent long term solid job.
Painting with Plastidip
It goes on much like normal paint. You prep in the same way, degreaser is a good idea, then 4 coats is idea. The first is just a very light dusting to create a key. The second and third are to create a solid color, and the last coat should go on really thick and wet. That makes it dry to a nice even mat color. You can add a plastidip glossifier coat but I've never found that it lasts long gloss.
One caveat of plastidip is that gas eats it. We'll see how long I managed to keep the gas tank in good shape. It will require care and attention at the pump.
The things I dipped:
- wheels
- rear suspension (masking the top and lower mount and the inner shaft)
- side covers
- lower front shocks
- gator clips
- tail light
- gas tank
- gas tank cap black
Things I painted:
- chrome headlight ring
- chrome speedo bezel
- chain guard - possibly a mistake. We'll see how that works out. Dip might have been better.


Wheels & Tires
Let's start with the most obvious change.. the tires. I' m a huge fan of the look of larger tires. Larger tires make this bike less agile and for sure feel bigger and if you don't want that, don't do this. Note that my front and rear are both 18" rims, and I have a suspicion that later models had a 19" up front but not 100% sure.
Life tip. Buy a harbor freight tire changer with motorcycle attachment. That's only about $100. Then buy a quality tire lever, like a NoMar.. that's more than $100, but at that point you are saving a whole bunch of money. I also bought the HF balancer, and I do all my own car and motorcycle tires now on my older vehicles. This has paid for itself many times over, and allows me to buy something experimental like this and not have to trot off to the shop if I change my mind. Here's me getting to know it. back when I was a bit fatter. Keto Diet FTW.
With these big tires there is definitely more road noise and top speed is reduced. If your bike is for the highway commute don't do this.
I agonized over what size to go with trying to find photos of similar bikes which lead me to Mutts Motorcycles out of the UK. They look very TU250x and someone said on facebook, and I think I believe them, that they are actually built using the TU250x as a donor / starting point. They look so good from a tire proportion size, but here's a thing.. If you zoom into the pics, the tires in the pictures are not the tires in the spec. Many of the pictures have the bike running 120/90 tires, where the spec is 4.1 front and rear. In the end I just decided tires are cheap, so buy one and try it. I bought a 4.6x18 first knowing if it felt too big for the front, it would be fine on the back. The first ride felt a bit "heavy" and by the third ride I was completely used to it. Now I very much like it. I've thrown it around dirt roads and it feels very very solid. I feel a bit better about bouncing up curbs with more bulk up front but that's feeling not science. Not sure what the science is. If you go up in tire, you probably have to go up in tube so don't skimp on that step. I pulled the front mudguard assuming it wasn't going to fit, but either way, it was coming off. I tried a piece of junk mudguard from Amazon, and it looked bad, rattled, and was poorly constructed so for now at least - I'm going naked up front.
Having decided the 4.6 was staying up front, I went with a Shink 244 5.1x18 at the rear.
Front:
AHL Motorcycle Tire Inner Tube 4.10/4.60-18'' TR4 Straight Valve Stem
Shinko Dual Sport 244 Series Front/Rear Tire (4.60-18 69S)
Rears:
IRC T20064 Standard Tube - 4.25/4.50/5.10-18 - TR-4 Stem
Shinko 244 Dual Sport Front - Rear Tire - 5.10-18/--
Wheels: Plastidip. See this video I made when I did my CT90. It's very easy and very satisfying.

Handlebars and Mirrors
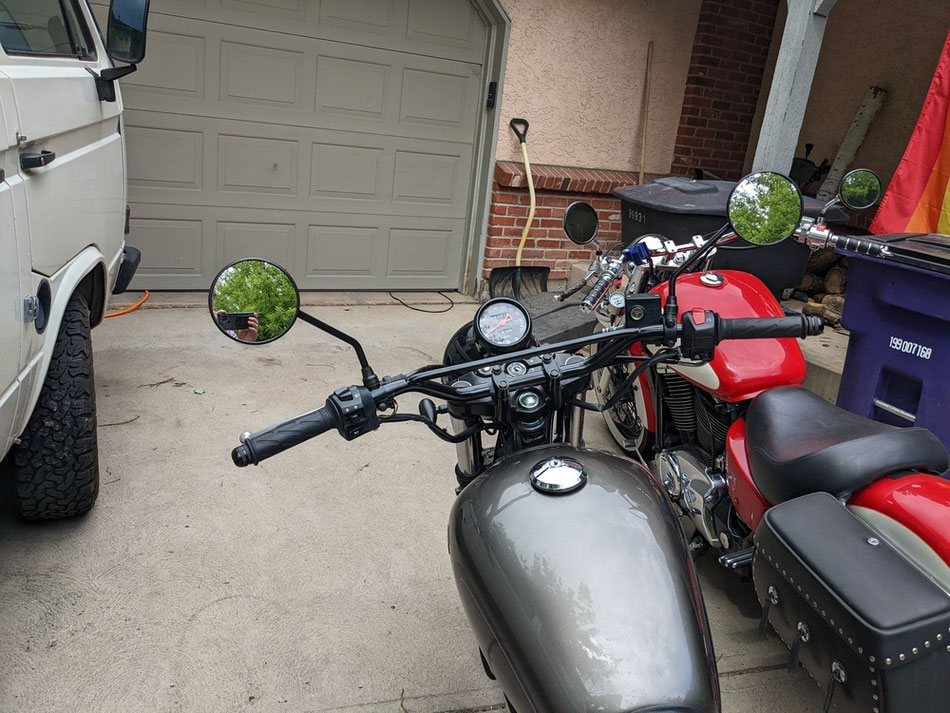
7/8" handlebars are cheap as chips. That's something I love about the TU!
Hopefully this ebay link stands the test of time.
$39 Free Shipping
2FastMoto HONDA CR STYLE 7/8" HANDLEBAR BLACK DIRT BIKE MOTOCROSS BARS 23-92461
I very much like them. Some gotchas:
- The turn signal cluster on the left, and the throttle on the right both have a little plastic nub on them. The stock handlebars have a hole for that nub. The purpose is so they don't twist. For these bars you either have to drill a hole in the right place, or grind off that plastic nub. I went with drilling the hole.
- These are a little bit wider. I had to loosen and / or cancel the cable tidies for the brakes / throttle / wiring. I'd say if you go any wider than this you will probably have to get longer control cables / hoses.
I then added bar ends. The theory is that on a thumper bike like this, a weighted bar end damps vibration. When I got my bike it had end mirrors so the original weighted bar ends are long gone. Another cheap purchase on Amazon.
Motorcycle Bar End Weights Anodized BLACK for 7/8" Handlebars - PAIR
Mirrors must be round! How did this memo somehow get lost with modern motorcycles!
If at first you don't succeed (buy mirrors that don't work), try again. This was my second attempt at mirrors and I like them. The reviews range from "Awesome" to "Junk" but that is life. I find them to be a decent finish, the correct thread for the stock mounts, and although there's a normal amount of vibration affecting their use, they don't flop around at all.
$18 on Amazon!!! You can't beat that!
DUILU Motorcycle Side Mirror 3.94" Round Rearview Mirror with 10mm Bolt (black 2)
Turn Signals
OK.. a contentious subject. Some would argue that changing turn signals is a safety issue. I argue that USING turn signals is a safety issue. There is nothing more dangerous than driving down a road with cars entering and crossing when you have a long forgotten turn signal on. Personally I use hand signals apart from at night.. so turn signal position isn't that important to me.
I think the stock turn signals are ugly and stand out. I bought a set of tiny bullet lights that I tried and didn't like, but then bought these which I think are really good. Good in that you don't notice them. They aren't a statement - they are there, and they work, and the styling is right.
$15 a pair on Amazon.
FRONTS
I spliced in connectors so that this is somewhat manageable.. but wires were cut. Not gonna lie. Seemed to make most sense to cut the wires off the original lights and solder the connector into the new ones. Before installing I opened up the lights and noticed they were black so squirted in a bit of the lightest paint I had. This may be a complete waste of time but as there's no reflector in these it seemed like a good idea at the time.
REARS
Same deal on the wiring. For placement they are mounted in holes drilled in the shorty fender mod.


Headlight
I would love a modern LED cluster light that is black apart from the various "orbs" but this is an area where I can't justify the amount of effort when I'm OK with stock - especially after blacking out the chrome. That doesn't mean I don't want more light. Based on the spec of the original bulb, these drop in LED lights seem like a good fit. Could only find them in pairs - so I have a spare.
They fit well and at $40 for 2, the price is right.

Definitely brighter than stock, and a nice pure white.
I added a stone grill to add to the scrambler look, but also to darken out some of that remaining chrome on the headlight. It came with 3m double sided tape to attach it. I was skeptical, but it seems to be holding up fine. As always, the trick is prep. I cleaned off the headlight with nail varnish remover to give the tape best possible chance.
Motorcycle Mesh Metal Grill Cover for 7" Headlight Matt Black Scrambler Project

Front Forks
Pretty straight forward here. The lowers are black plastidip with the reflectors removed, and the fork boots are from WeBike in Japan. The reflectors are attached with a double sided sticky pad and hard to remove without destroying them. I guess if you really wanted to remove and reuse them a cheese cutter / piano wire would probably be the way to go. The glue is for sure stronger that the plastic surround of the reflector so if you leverage at it, it's going to break. I leveraged / hammered it off with a plastic trim removal tool and they did not survive in one piece. The glue pad was pretty stubborn but I worked them off eventually with nail varnish remover.
Plastidip is IDEAL for this purpose, second only to getting them powder coated. Plastidip does not chip and the fronts on my CT90 have taken a beating and remain in great shape. See the photos below. After cleaning the parts you want to spray with a degreaser, do a VERY light dusting for the first coat and let it dry. You can then do a few more coats waiting a few minutes between each. The last coat should be sprayed on thick and and should look like a bright gloss finish while wet. It then drys to an even mat black.
I remove the forks for this, which is a very easy job once you get the bike stable. Personally I use a hoist in my garage. It's a simple boat trailer crank attached to a strengthened wall stud, running up into the rafters and over a pulley that's on a 2x6 that spans several joists.


For gators.. or whatever they are called.. the rubber middle fork protectors, I searched Amazon in vain based on the measurements on the webike page to find these on amazon but couldn't find a match that I was SURE of. I've seen some others used, but the Webike ones in the photos just look "right" in their marketing. Cost including shipping the US was $44 and they arrived in 10 days. They come with silver clamps for the upper end which stuck out like a white sock at a funeral, so more plastidip.


Exhaust
Nobody seems to have found a simple bolt on here because of the unusually small 1.25 inch header. There's a fair amount of consensus that the EMGO muffler is a decent product, although it seems like to get the best out of it it needs to be repacked. That results in a more bearable sound volume, and also can help bring the back pressure down towards stock to keep the engine happy and avoid popping on deceleration. I bought an EMGO long only to find the baffle is not removable, so it's going back but I grabbed a universal exhaust that would arrive before the weekend. It looks similar to the EMGO that is often used and only $65.
I bought this reducer as in theory it should work in combination with the reducers supplied with the exhaust.
It came together pretty well although I have no idea how the springy reducers with their massive gap have any chance of actually stopping exhaust gases! I still have to circle back and use exhaust gasket paste to tight that all up, but what you see here is the way to go.

From left (back of bike) to right (front of bike) what you see here is:
- largest reducer supplied with the muffler
- middle reducer supplied with the muffler
- amazon purchased reducer
- bicycle seat post clamp
Yup! Bicycle seat post clamp. Turns out it's absolutely perfect for clamping the this all to the Suzuki header. I cut some slits in the amazon purchased reducer to give the clamp some give to work with but it just works perfectly.
At the back end though it's a bit of a fight. Having three metal parts + muffler telescoping into each other is a lot of potential for slipage. I solved it a little by spot welding the middle reducer to the amazon reducer in one spot but I might revisit this and tidy it up. I suck at welding which doesn't help.
Mounting the muffler itself was easy enough with the included hanger, although I hammered the crap out of it all kinds of ways until I eventually took some actual measurements, and cut it and drilled a hole where it needed to be then hit it with paint.

This is a straight through exhaust although unlike the EMGO it has a cup on the back which is handy, as I want to stuff it with pot scrubbers to try and match the back pressure of the original. Photo here from Amazon.. and looks like they ran out of black mufflers!

I thought I could be really clever and use a shop vac to calibrate pot scrubber stuffing. I used it to suck the OEM muffler and this muffler with various stuffing inside trying to match the rise audio pitch of the vac, but the original didn't have enough back pressure to make a very measurable change so I just had to do it by trial and error.
I started with 3 pot scrubbers, and the bike had a noticeable hesitation at low revs so obviously too much. I pulled two out and the it popped on decel so too little.. thankfully because the noise level was annoying. Threw in one more, so now at two, and I think it's good. Not quite perfect, but I'm not sure if it's too much or too little. As the process involves pulling the pipe off I got kinda bored of it so it is what it is for now. I'll come back to it.


Seat Thoughts.. Maybe One Day
IN PROGRESS :: I'm struggling a little here. As a primary purpose of this bike is for two up with my wife, I'm cautious about major seat mods because the stock seat, from a comfort perspective, is pretty good.
I bought this seat from Amazon to play around with.
DKMOTORK 0165 Motorcycle Brat Cafe Racer Flat Vintage Saddle Seat Brown(Professional modification)
It's the longest one I could find. With the fender on it sticks up in the air and there is no way.. With the fender off it appears that there are possibilities.
Even then, the angle isn't quite right - and I'm not sure if on full travel with the knobbly tires how much room I have to play around here to build a bracket etc. Last thing I want going down a dirt road with my wife on the back is to hit a big bump and have that rear tire trying to destroy what little is between it and us.
Here's what I'm thinking:
- Stick to stock
- If one of those unobtainium Australian made bolt ons surfaces used, buy it. (update. Seems like their website is back.. but $550!!!)
- If I really want a flat seat, take the stock seats and somehow turn them into a single pan and have a seat builder add a really nice gel seat. I've seen other people create a split new design with the two seat pans, but I'd rather structurally join them and have a nice looking flat bench seat. Shouldn't be too hard to connect them as one. Metal? Printed part? Fiberglass? All of the above?
Tail Light
Finding a tail light turned out to be a little more challenging. Supply chain issues? There are units that match the turn signals I bought but I want MORE LIGHT at the back for braking.. this is a serious safety issue. There's another popular one, readily available, but I have it on my Honda 50 and I know it's pretty basic.
In the end I gave up on Amazon and eBay and started looking at other motorcycle outlets and found this at jpcycles.com.
TC Bros. Choppers 33 Ford Replica Side Mount Tail Light/License Plate Bracket
The description details that it's an auto style bulb, so I know I can switch in an LED to make it brighter. It's a nice stainless steel outer and the brackets are solid, although turns out the license plate blank isn't symmetrical when mounted horizontally so that's a bummer. I'll had to make something out of a sheet of tin.
Happy though. Light quality is excellent with real glass on the back and in the licence plate light window. It took Plastidip really well and looks good in black. I think this is the most expensive part I've bought for the whole build! I'm ok with that. Safety.
Fender
I'm going for a few things here.
- That minimalist look that stripped down bikes have where there is the least clutter around the wheel, including around the battery area.
- Stock seats (for now) until I come up with something that is as comfortable or better two up
- No question of safety for my wife sitting behind me, so this is not an area where I'm going to trust my crappy welding
Because of point 3, basing the solution off the original fender in some way is the easy way to go. That is tried and tested.. it has all the mounts for the rear seat, so the easy thing to do would be to cut down the original fender and hack up the rear light mount as well.
I almost threw up in my mouth when I looked at the retail price of those parts. When you take the fender and the tail light you're talking about $700 if I wanted to revert, or probably a solid $400 if I wanted to sell mine on eBay bit by bit!
"eBay.. Hum.. let's go look", I thought. And that's when I found this for $35 + shipping, $60 all in.

This is the metal structure that hides under the plastic fender. I realized there's a REALLY good chance that I can turn this into what I want. What I really like about it is that it has the strength and mounting points of the current fender, without all the visual bulk.
It showed up and it's a bit rough (I'm spoiled by Colorado weather) but it's fine. I spent a few hours just looking at it and mocking up what might look right with the stock seat and the cheapo long seat from Amazon which looked good.. but I decided to stick to my guns and stick with stock.


The cut point revealed itself as pretty obvious. I just lopped off the lowest section and drilled a hole that you can see in the middle of the last piece. The pillion seat is mounted to a bolt on the rear cluster of the original fender, but positionally it is right here. I'll use this hole to mount the rear light, and then the seat.

The rear loop is optional here from a strength perspective. It just loops the seat, not actually supporting it. This metal fender frame is 100% of the structural integrity of the rear seat mount. I drilled a hole for the tail light on either side, then put a bit of a bend in one of the brackets that came with the tail light and it all just kinda worked, with or without the rear loop. I used a bit of tin sheet to create a bracket for the license plate and called it good.
What is currently in progress is how to clean up the look of the back here.. if I even do. I'm living with it right now, because after cleaning off the rust and hitting it with paint I'm kinda ok how it looks, holes and all. The loop hides most of the "gaps" but ideally I'd like an actual fender over just to finish up the back tail, and to cover the rectangular gap nearest the back. That requires bending metal in two directions which is beyond me. I could possibly do it with a sheet of plastic and a heat gun but still in progress.
If I do find that I actually like the holy tail, then I'll at least go back and work out a way to bridge the other gaps because right now if I get caught in the rain this is offers zero protection from spray coming right up between the two seats. Might tickle a little!
Again - the EASY thing to do would be to slice up the original fender, but I've come so far without doing that, I'm not gonna. If one comes up on eBay for cheap I might give that a go, but more likely I'll either go to a custom motorcycle shop and see what they have that might work, or go to a motorcycle graveyard and find something that can work.
With what I know now, if I was doing this again I would just use this part from my own fender. Even with the back cut off it would be easy to reuse it with the stock fender, or weld the cut piece back on.. nobodies going to know.
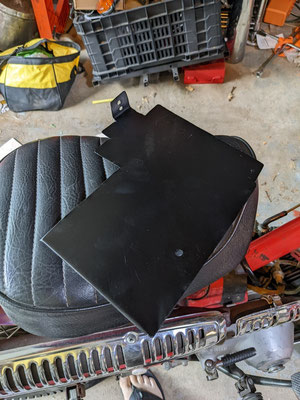
Battery Splash Protection
It makes sense that part of the job of the original fender, that extends into the bike all the way to about 3 o'clock is to protect the battery and other circuitry from spray. It also visually hides them. When I pulled the fender, all of that stuff just screamed ugly at my eye balls so I had to do something about that. One of the goals here is a nice minimalist look so relays, ECU, battery randomness, wiring looms does not work.
First thing I did was jump in the car and drive around nearby apartment buildings dumpster diving until I found an appliance.. in this case a dishwasher and ripped the door off it. No point in going to home depot and spending good money on sheet metal when it's lying around all over the place.
I'm not much of a metal worker, but this turned out just fine. A basic sheet cut to the right shape with a hole or two in the right place to allow it to be mounted using available mount points. You'd never know it was there - but if it wasn't there, you'd know there should be something there if you know what I mean.


Ammo can Pannier / Saddle bag
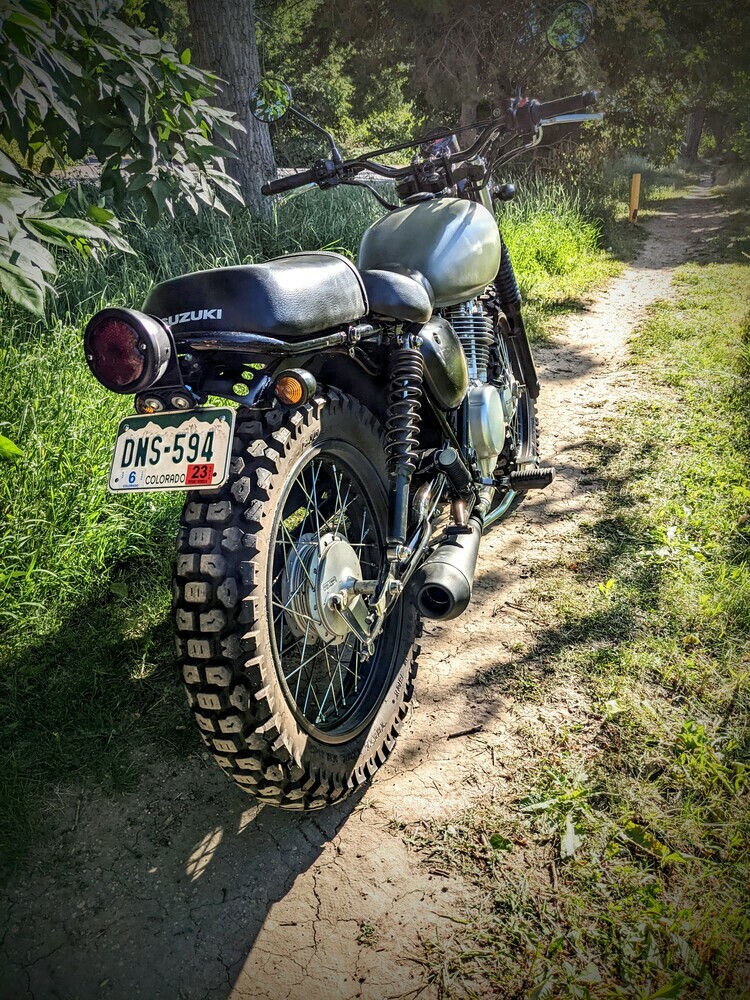
Since painting the tank olive green I've been drawn to the idea of expanding on the military vibe. When poking around pipeburn.com I found some inspirational bikes and thought, why not.
If I could wave a magic wand, there would be readily available 2.5 gallon Jerry Cans converted to hinged storage units because they look stunning.. but there are not. Ammo cans are the next best thing, however I'm uninspired by the readily available new and used 30 and 50 caliber units. Sure - that would be the EASY way, but I just don't like the dimensions. Searching around the web I discovered the less common 40mm can, that's 6x10x19 and I think that's perfect.
Off to eBay I went and picked this up for $35 shipped.
It's used but it's in great shape. It's not a perfect match to the plasti-dip cammo paint I have so I'll have to fix that. I spent some "umming and aweing" time walking around the bike and making a placement decision and did definitely feel that this was a go.

For me this placement is good, and only having it on one side is also good. I know it's less traditional than balanced saddlebags on both sides, but I kinda like it.
How to actually attach it though.. not so easy. The main bolt attaching the loop and the fender is in a great spot bot that's just about it. I considered spidering off to the front seat bolt on this side, but that seemed like a pain and not going to add much value so I decided to add an additional mount point on the rear fender as far back as possible.
I will admit that I am not much of a welder.. in fact, I use a bad welder badly - that's about the best I can say about myself. I built a bracket that turned out to be woefully insufficient, then simple continued to add braces and additions to it until it worked. It works well, but it's not something reproducible.. it's a bunch of random pieces of metal at random angles. I probably put 10 this in total so I'm glad I actually like it.
The result is a rearward positioned pannier.. and it's very solid. The bracket has a mounting plate about 6x3 nearer the front, and a supported spur mounted down near the back bottom corner made out of square tubing for rigidity. It also has a leg hanging down with a pad on it that rests on the shock just above the mount. While this will have a small amount of travel, the pad moves freely on it and gravity keeps things in order.
I'm liking it!


Still To Do
- Fine tune the exhaust / back pressure via pot scrubbers
- wrap exhaust header
- Exhaust gasket paste to completely seal the reducers
- Tidy up rear fender somehow.. at least close the gaps under the seat
- Fit the 16 tooth sprocket I have
Maybe??
- Front Fender?
- Side Covers Green?
- Rims Green?
Summary & Total Cost

Well did I create a bike that I love? Oh hell yes. I love how it feels. I love how it rides. I love how it looks. For me it went from "great" to "awesome" when I painted the tank. That somehow just stepped it up to another level in terms of changing it's identity from a modern Suzuki to something a bit more special.
On money.. I made it. As I write this, I'm at $725 including an estimated $50 for paint (UPDATE :: Went over with the Ammo Can!)
I'm cheating a little bit because not included there are a set of mirrors and a set of turn signals that I bought and hated.. and the seat ($60ish) that I'm not using, but it is what it is.
I'm considering tying to break even by selling all the OEM parts as my next challenge. It's tough to get an idea of numbers though. eBay Sold Items show very little in the way for TU250x stuff. I don't know if that's because there's no market for it, or it's unusual. If it's hard to get used parts, they should be worth good money, but I won't know until I try it!
Useful Links
Suzuki TU250X Group on Facebook
Invaluable.. and possibly the only link required, as it has a much better list of resources in it's pinned posts than I do here.
If these aren't based on the TU250X then they are based on something pretty much identical. A great site to see how a TU can look and get some design ideas.
A japanese parts store that has a lot of stuff for the TU250X (called the ST250E over there).
Another great source for customization inspiration
Write a comment
Jeff Snider (Wednesday, 22 June 2022 12:47)
Brilliant !!!
Love your design, thought process and end result, as always!!!
Sandy (Sunday, 28 April 2024 17:55)
Very sweet bike! Nice work!!
Ride On!!
Gerard Ungerman (Saturday, 07 March 2026 09:43)
Thank you so very much for all this info. You did a brilliant work and there's a good chance I'll try to replicate that in the near future. I also want a capanle, good-looking and nimble scrambler I can load up when traveling with our truck and RV trailer.
Ride safe.