In an ideal world, we would all think through tactile before starting our driving sim build. Many people (me included) don't, which means there's a good chance they have a typical car like seat, either pulled from a wreck, purchased for the rig, or one of the many sim rig chairs built in the same kind of construction. I have the passenger seat from a Mitsubishi Eclipse.. complete with AirBag! $60 out the door of my local Pick-and-pull and in great condition, as many passenger seats tend to be.
Adding tactile to a chair like this has some challenges in terms of placement and efficiency. A solid fiberglass seat has different challenges, like it's harder to use screws or bolts, but does allow shakers to be stuck to it anywhere. Lots of shakers, and in the evolution of tactile in gaming this is often touted as the way to go.
What to do? Well swapping out for a fiberglass seat is an option, but if you're not up for that, and you want to get the best of what you've got here are some tips.
About me and my setup
I'm on the third incarnation of this driving chair. It keeps growing and becoming more complicated. I started it as a project to learn welding, and quickly learned the limitations of a simple flux welder.. and my own limitations in this skill. The more it evolved the more metalwork gave way to woodwork, something at which I have much more experience.
The end result puts the setup squarely in the DIY category, although hopefully just above the "Ghetto" rig that is sometimes used as a label. While I'd love an 80/20 build, mine is really strong, reasonably pretty, and I've become very attached to it warts and all. I also have the perverse pleasure that in terms of seat, wood, steel, and the Thrift Store laptop table used as the riser for the steering wheel I'm probably at about $350 total spend. Not so shabby.
Relevant Vibration Theory
Efficiency
Bass shakers / tactile transducers, and exciters can deliver a finite amount of energy. There is no point in them shaking themselves to the max if that energy isn't being transmitted into the driver. Car seats go through vibration testing to ensure they transmit as little vibration as possible (at specific frequencies) for health and safety requirements. There's a very boring ISO standard that goes into all the details. That means you're fighting somewhat of an uphill battle, but it's still winable. The major challenge is to get energy to the driver in spite of the fact that these seats are padded.
On top of that, normal rules of isolation apply when it comes to vibration. If you have a cocktail sitting on a big table and you want to mix it up, it takes less effort to shake the glass than it does the whole table. By using simple isolators to create a soft separation between what you want to shake, e.g. the seat) make the energy you have available go further.
It is for damn sure, that they early days of tactile of just bolting a shaker to each corner of a rig are long gone thanks to better understanding of efficiency.
Multiple independently controlled Shakers
This is one reason why fiberglass seat setup offer more flexiblity.. you can mount shakers up and down them and control them independently. With the car seat some of the theory and discoveries being applied in this way can be used, but with a car seat you have to think more in terms of "zones".
How many different areas of the seat can you inject vibration into that can be distinguished from each other in terms of feel? Can you get much better "bump" experience by having multiple bump channels hitting different parts of your body with slight delays. You can indeed.. so different zones up and down the body are a good thing.
Choice of Transducer / Exciter
This really goes back to efficiency. Small Dayton Puck Transducers and Exciters are not likely to be enough on their own although could be used to add some higher frequencies to some zones. The bulk of the work needs to be done by a more hefty shaker like the AuraSound AST-2B-4 or a Buttkicker Mini of some flavor. Big Buttkickers would of course be awesome too. I know there are other shakers out there of similar size and weight, but I haven't tested them so you'll see me reference the AuraSounds and Mini BKs here.
Shaker Wiring Phase
Have you ever wired up a stereo and it just sounds.. wrong?
Speakers don't really have a "+" and "-" terminal because the signal is alternating current, but they are marked in such a way. It's not important if you wire the + on an amp to a - on a speaker, as long as you do that consistently with all of the speakers. If you mix and match, one speaker is "pulling" when the other is "pushing" and you get sound wave cancellation where the original intent is sound waves combining.
How does this apply to shakers? Shakers are typically mounted on the horizontal, projecting energy up and down. When using different zones, you might (as I do) have some shakers mounted upside down. These should be OUT OF PHASE from the shakers mounted the right way up.. in other words the wires should be swapped. This ensures that the vibration of one shaker isn't cancelling the vibration of another.
So here are some options
Zone 1. Lower Cushion
Car seats of this type are typically not a single piece. If it has a recline feature and is not a pure "bucket seat" then there is a very good chance that there is a "L" shaped frame. The back cushion is very much integrated to the frame, but the lower cushion is BOLTED to the frame.
This is great news.
Replacing these bolts with simple shock mounts means that adding shakers directly to the seat pan gives you the ability to send energy t the butt / thighs that is somewhat isolated from what you do with the rest of the chair. These are cheap, and work well although of course, the size of the bolts in the seat dictate if they will work for you.
https://www.amazon.com/gp/product/B01N0X2UCF/ref=ppx_yo_dt_b_search_asin_title?ie=UTF8&psc=1
Note this will raise the lower seat pad the height of the isolating rubber piece. That shouldn't be a problem, but if the bolts from your frame to the seat pad are at an angle it may mean that not all 4 will line up anymore. I added isolators to all 4 bolts on the seat, connected the front ones to the frame, and allow the rear ones to rest on the frame.
I have shaker in this location, right under by my butt, but adding two side by side for stereo would give more energy, but I doubt that the stereo effect would be strong. Mounting here is fairly LOW in efficiency. There's a lot of padding to get through here. This is the shaker I have turned up the highest.
Now using an AuraSound here. Photo is from when I had a BK Mini.
Note:
- the metal pan is fairly thin, so I ran a bar across to add more rigidity
- the isolators "just work" in the holes that are already in the seat.


Effects I use here.
All effects mentioned here and below are from Simhub. I'm not putting too much detail as I change it all the time and improve it, and what is right for me won't necessarily be right for you.
I think of this zone as a filler and throw various things at it to augment rather than be the hero. It's not a very efficient zone so mushiness is part of the deal.
RPM
I think of RPM as an IDLE effect and put it through all shakers as above 1,500 I have it fade to nothing and it doen't get in the way of driving. I have 24hz in this zone and 28 hz in zone 4 which gives me a pseudo 4hz pulse feeling at idle as the two phase in and out.
Speed
Either the Speed module OR Simulated Road Surface depending on my mood.
Road Vibration (Bumps)
0ms delay. Mono / Rear
Zone 2 & 3. Left and Right Frame
This is where things can get a bit complicated. In the early days of tactile a common practices was to mount a shaker to each corner of a rig and call it a day. The inefficiency of this setup is incredible. Not only is much "shake" wasted, but the entire design of most rigs centers around rigidity, so stereo effects are very much diminished.
To put it in perspective, when I got some AuraSound shakers I mounted them to my rig because I could do it quickly and I knew I wouldn't have time to do things properly until the weekend. When I rebuilt my setup in the following way I estimate I increased the amount of shake by 10x minimum. In this configuration I cannot endure long sessions with the shakers at max. It's that efficient.
Additionally, stereo effect is more than acceptable.
This setup considers:
- This is not a real car. I will not get rear ended at a stop light. It is OK if the seat is only mounted to the frame at the front
- AuraSound shakers are built like land mines. They are practically indestructible.
- The most efficient way to get vibration energy to my body through the upper cushion is to inject as much as possible into the steel frame of which the cushion is an integral part.
- Shakers use a piston that travels up-and-down if the shaker is mounted on a horizontal surface. The closer the axis of the frame is to the axis of the piston, the more efficiently energy will be transferred
- The shaker is steel. The frame is steel. Direct contact is ideal and gravity is a good enough anchor.
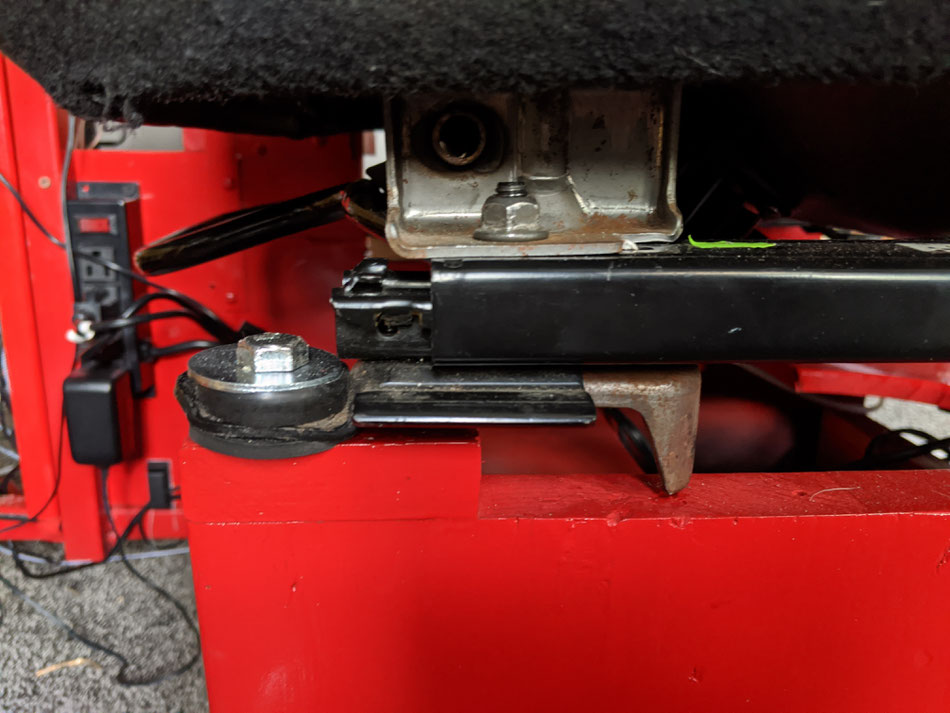
With that in mind, this is what I did. For me it wasn't a massive amount of rework because around phase 3 of my rig I gave up on welding (I suck at it) and switched to wood (I"m ok at it). What you see here is a horizontal platform with small isolators (M4) bolted to it, then the Shakers placed on the upper bolt. The backs of the chairs sliding adjuster then simply sit on the shakers.


I don't see why this couldn't be done with an 80/20 rig too. I can't tell you how efficient and powerful this is for this kind of chair.
Of course with this approach, how the front is mounted is very important. When driving hard there is going to be significant sideways and upward force on the front mounts. I considered using the bigger shock mounts here but mounting that into wood.. tough. Also they are designed to have a force pushed down ONTO them, and I have no idea how much force is needed to basically tear them in two or shear them.. so that was a no for me.
I did a half assed isolation job, but I think it's ok. I used rubber washers to isolate the bolt from the frame and the frame from the chassis. As the shakers are directing the energy UP into the frame, I think this is fine.
Effects I use here
This zone provides me the bulk of my stereo experience. I have stereo on the pedalboard but the very nature / stiffness of pedals means much of the spacial content is lost in perception.
STEREO obviously.
RPMs
As I said.. I use them everywhere and tune them out at 1500 RPM. I like to be moved at idle.
Road Vibration
This is it's main job.. to give me a left / right sensation of bumps. I use a different bumps instance, and have it on a slight delay of around 10ms but experimenting so my lower back is getting the bump slightly after my butt. I need to learn more about this technique because it's a great advantage of zonal tactile.
Speed with Cornering
Just a touch, and at a very low frequency and very low volume so I can just feel it in contrast to the speed information up through Zone 1.
That's about it. I do not want to dilute the shakers ability to focus on giving me good stereo bump effects through Road Vibration module!
Zone 4. Injection through Headrest into Frame
This is the advantage of a REAL car seat over many racing seats, and it's really meaningful. It's the most recent thing I've done and the least I've experimented with. It's rather sick.


.. and on the subject of "sick", the human brain has a resonant frequency of 10hz to be careful.
I'm still experimenting here and it's March 2020 - which means the whole family is home all the time, and I can't torture them with full tactile volumes very much.
I'm interested in testing a shaker mounted on the vertical plane to see if it could add more in the way of back and forward vibration. Could that be more meaningful? Could two shakers be used? Each mounted to its own rod to inject a different signal into each side of the frame?
Big question, can I bring myself to buy another BK Mini to find out? Not so sure about that :)
What is clear already is that this zone adds another dimension of realism and flexibility. I've used the AuraSound and the BK here and I like the BK better as it has a wider range, and can go a bit lower. FINALLY found a good spot for it where it's smooth response doesn't have to compete with the raw power of the AuraSounds.
If I feed a pure signal into this I feel it around my shoulder blades. If I feed the same signal as Zones 2&3 and play with the volume I feel like I can move it up and down my back. I swear there are times I feel there is a huge shaker right in the middle of the back of the chair.
Effects I use here
RPM.. as usual
"Speed"
I toggle between various effects to simulate speed, but never use the same effect twice, so if I'm using "Speed" here, I'd be using "Simulated Road Surface" ( or whatever it's called) in Zone 1.
Deceleration
Oh boy. Even with my very cheap amps I can get something at 15hz on the BK. Volume on the effect has to be high, and it's subtle, but wow.. on hard deceleration I get an almost dizzying effect. It's the most jaw dropping element of my entire setup.
Road Vibration
Mono / Rear. Another module, again with another delay. Still experimenting.
Others.. still in the playing stage.
Other Possible Zones
Front Seat Mounts
I bet it's possible somehow, and I'm sure a stereo pair at the front of the seat would probably communicate front bumps better than typical 4 corner setup or pedal board shakers.
I don't know if I have the energy to tear my build apart again, but if I were to do this I'd weld M8 bolts to an AuraSound shaker top and bottom. Top bolts to the chair, bottom goes to an isolator. My concern is rigidity.
Front of seat pan
Could Exciters be stuck near the front of the lower seat cushion on the metal pan and put out enough energy to hit the leg area with another discernible signal? I don't know!
Inside the seat back
Now this is where I'm torn. The seat back cushion really is a single piece strongly integrated with the frame. I know for a fact that Exciters have zero impact when positioned on the plastic back of the chair, and even inside the chair. Very little transmission if mounted to the side bolsters.
But would it be possible to carve out the seat foam and attach exciters to the back of the fabric? I don't know.. and it's too irreversible for me to pick up the courage to find out.
Write a comment
Bryan CAVILL (Friday, 02 December 2022 23:37)
Thanks for writing this. I am just about to go the same route. People seem to have missed that horizontal shakers makes the forces work in the same plane as the would on a real car. I plan to fine tune the sensation by adding rumble motors to the brake and accelerator for slip and abs.
Jimbo (Saturday, 04 March 2023 08:03)
Also be aware you can cause brain damage using around 19-21k (i forget the exact number)